Primo avvio
Primo Avvio
CellMapper è un'utile applicazione per individuare le Stazioni Radio Base (SRB, o BTS) 2G/3G/4G/4G+. L'applicazione misura la potenza del segnale e i dati di rete raccolti dagli utenti finali e li usa per localizzare le SRB e visualizzare la loro copertura. L'applicazione è al momento disponibile per Android e dispositivi mobili con Windows 10.
I server di CellMapper elaborano i dati inviati dagli utenti e li dispongono tramite una rappresentazione grafica su una mappa di Google Maps, che può essere navigata direttamente dall'applicazione Android o dal sito principale di CellMapper. Il modello utilizzato non tiene conto di alcune variabili, per cui al fine di ottenere dati affidabili si dovrebbe tenere il telefono utilizzato per effettuare le misure in una zona il più possibile aperta e senza ostacoli. Un campo di misura ideale è quello più sgombro possibile, come ad esempio una grande prateria, ma ad esempio in città gli ostacoli sono inevitabili. Quando si effettuano delle misure, ci si dovrebbe muovere in semicerchi a distanze differenti attorno alla presunta SRB, al fine di ottenere i risultati più precisi.
L'applicazione supporta il trasferimento in tempo reale, così che i dati raccolti vengano inviati ai server di CellMapper nel momento stesso in cui fai le misure. Puoi anche decidere di inviarli manualmente dopo aver fatto le misure, o re-inviare dati già raccolti. Quando tutti i file sono stati inviati al server, vengono elaborati nel giro di alcuni minuti, se non c'è troppo carico sui server stessi in quel momento. Se i server sono sovraccarichi, l'elaborazione dei dati può richiedere alcune ore, o anche un intero giorno. Il ritardo dell'elaborazione è un problema noto, e verrà affrontato in futuro.
Quando usi CellMapper, tieni conto che:
- Il consumo di batteria aumenta (a causa della ricerca di segnale GPS e delle misure di rete).
- Lo schermo non verrà spento mentre l'applicazione è in funzione (aumentando il consumo di batteria!). Se hai un telefono con schermo Amoled, puoi oscurarlo per l'intera durata delle misure tramite le impostazioni dell'app.
- Le SRB collocate in zone urbane vengono localizzate meglio se si procede in maniera circolare per i vari quartieri della città. Man mano che le zone si fanno più rurali, dovresti fare dei giri più larghi per risparmiare tempo. Otterrai i migliori risultati in un terreno pianeggiante.
- Assicurati di avere una connessione sufficientemente buona alla Stazione Radio, così come un buon segnale GPS.
- L'uso dell'applicazione richiede una SIM dell'operatore del quale vuoi mappare la rete 2G/3G/4G. Puoi misurare solo le stazioni della rete a cui sei connesso, per cui per esempio non puoi localizzare una SRB 4G se sei sotto rete 3G. In genere, le celle 2G/3G/4G/4G+ possono essere tutte appartenenti alla stessa SRB, e a volte anche trasmesse dallo stesso pannello.
- L'applicazione può mostrare che una SRB copre un'area di centinaia di chilometri. Questi errori possono capitare se i dati di rete raccolti dall'applicazione somigliano molto a quelli di altre SRB, o se il telefono ha riportato una posizione GPS errata. Al momento, le "celle orfane" non possono essere rimosse dagli utenti e rimangono sulla mappa.
Utilizzo
1. Download App to Android from Google Play or to Windows 10 Mobile here.
2. Abilita il GPS.
(on Android you can enable Settings -> Location and Select Mode: High Accuracy or Device Only.
3. Avvia l'app. Assicurati di essere connesso alla Stazione 2G/3G/4G/4G+ che vuoi misurare. Non è necessario avere un piano dati, ma devi poter accedere alla rete. Alcuni telefoni possono anche registrare senza una SIM.
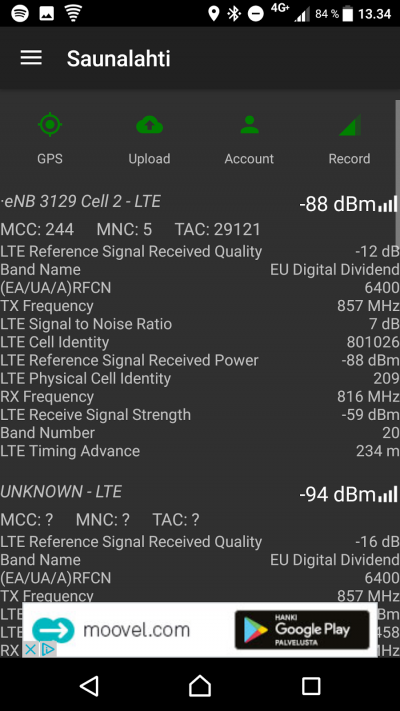
On Android you see here information what on your device. It depends your phone support what you see on screen. This is taken on Sony XZ Phone with Android 7.0. Since Android 7+ mostly phones support band recording also. All Windows 10 Mobile also support band recording.
Icons:
GPS: Green = GPS fix OK, Yellow = Initializing, Red = No GPS Fix, try go to outside to get GPS Fix.
Upload: Green = Upload enabled and ok, Red = Upload Error or disabled.
Account: Green = Login OK, Red = Not logged in or login error.
Record: Green = Record On, Red = Record Off
| Abbreviation | Explanation |
|---|---|
| Cell | Cell ID, this is used to differentiate cells from each other |
| Sector | The sector number of a cell |
| MCC (Mobile Country Code) | The mobile network country-specific code |
| MNC (Mobile Network Code) | Operator-specific mobile network code |
| LTE Cell Global Identify (CGI ) | Base station ID, used to differentiate base stations from each other |
| LTE Reference Signal Received Quality (RSRQ ) | Quality of received signal |
| LTE Signal to Noise Ratio (SINR - Signal-to-interference-plus-noise ratio) | The scale of the SINR measurements are between -20 and +30dB, the bigger the better. Signal strength is though of as "OK" when it is 15dB or over that, the maximum speed is then 50Mbps. You will need roughly 25dB if you wish to reach speeds around 100Mbps. All speed estimations are made using the 20Mhz bandwidth. |
| LTE Reference Signal Recieved Power (RSRP ) | Interprets the quality of the incoming reference signal. -50dBm is the best, -90dBm is good and -110dBm is weak. When the signal is better than -90dBm we can follow the SINR value alone. |
| LTE Received Signal Strength Indicator (RSSI) | Interprets the strength of the incoming radio signal. |
| UMTS RNC-ID | |
| TAC (Tracking Area Code) | Tells the area code consisting of multiple base stations. |
| LAC (Local Area Code) | Tells the area code consisting of multiple base stations. |
Map
The map opens from left side main menu.
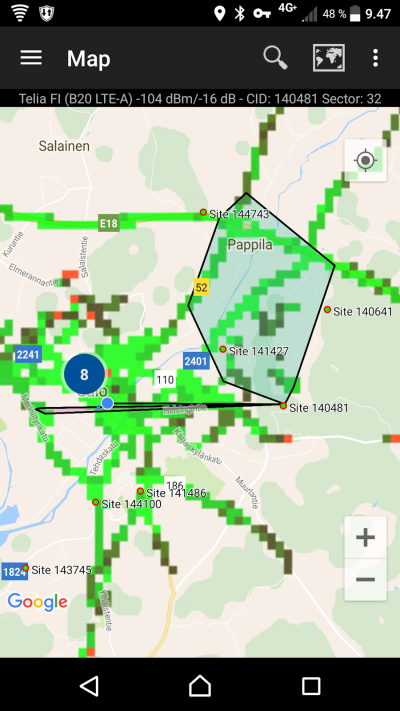
In the maps tab you can see the location of already mapped base stations. The application will automatically only show the base stations of the current network being used (LTE in the picture). The location of base stations can also be viewed from the Cellmapper webmap.
The base station is marked on the map as a red pin in mobile and a red arrow in a browser. A blue pin refers to your own location and the black line tells you which station you are connected to. By clicking on the base station you can see it's range as a black zone. Light green indicates best signal quality, dark green good quality, black average quality and red the weakest signal quality.
On green pin's (on mobile app map have red circle) is some user's located tower. You can locate tower on web map when you have reached over 2 000 points (need account).
By pressing Select Provider (Search Icon) on header you can switch the operator and network so you can inspect base stations of other networks.
Send data to server
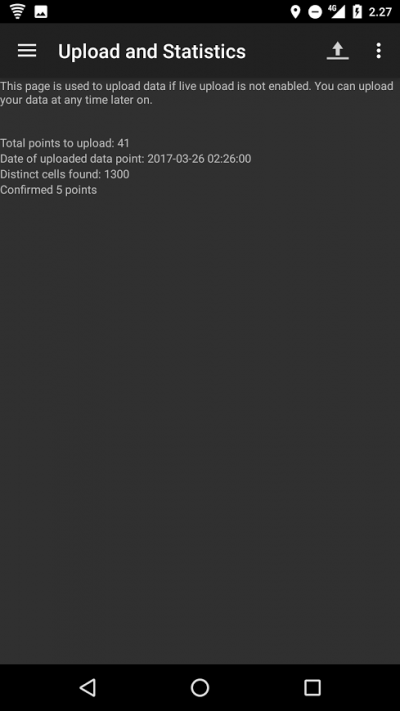
Open left side menu and open Upload and Statistics. You should always upload your newly measured base station so that somebody else won't have to go and redo it, and they can instead view it from the map. The cellmapper map is updated nearly instantaneously .
Press on the Upload icon after this and the data will be sent to the server. We recommend that you also turn on the Enable instant upload feature from the settings, so you don't have to press the button every time.
Account
With Cellmapper account you can track how much tower you have recorded, locate tower on web map etc.
You can register Cellmapper account here.
Need help?
Ask on our community help. We and our great community will help you here: Facebook, Twitter and Google Plus.
You can also send email to support (at) cellmapper.net.


