Erste Einrichtung
Erste Einrichtung
CellMapper ist eine nützliche App, um 2G/3G/4G/4G+ Sender zu lokalisieren. Die App misst die Signalstärke und andere Netzwerkdaten jedes Nutzers und berechnet daraus den ungefähren Standort eines Senders und dessen Abdeckung. Unterstützt werden bisher Android und Windows 10 Mobile Geräte.
CellMapper servers calculate the data that users have sent and creates graphical representation of it in the map delivered by Google Maps, witch can be browsed directly from the Android App or CellMapper webpage. The model can not account for certain variables though, so in order to get reliable data one should keep the measuring phone in as clear and unobstructed area as possible. An ideal measuring setting is as unobstructed as possible, such as large fields of prairie, but for instance in cities obstacles are unavoidable. When measuring one should move in 1/2-3/4 circles at different distances around the presumed base station in order to get the most accurate results.
The application supports real time transfer, so the data collected is sent to Cellmapper's servers as you measure. You can also manually send the data after measuring or resend already collected data. After the files have been sent to the server, they are processed within minutes if there is not much load on the servers at the time. If the servers are under heavy load then processing data can take up to hours or even a full day. The delay of processing speed is a known issue, and will be addressed in the future.
Wenn du CellMapper nutzt, solltest du folgendes beachten:
- Battery consumption rise (looks for GPS signals and checks network quality)
- Screen won't turn off while application is running (More battery consumption!). If you have a phone with an Amoled -screen you can turn it off for the duration of the measuring from the applications settings.
- Base station location in urban areas is best determined by doing round trips of city blocks. At more rural locations you should do larger sweeps to save time. You will get the best result on flat ground.
- Ensure that you have a sufficiently good connection to the base station as well as a GPS connection.
- Using the application requires that you have a subscription with the operator whose 2G/3G/4G network you are trying to measure. You can only measure stations in the network you are actively connected to, so for instance you can't locate a 4G base station if you are in a 3G network. Usually 2G/3G/4G/4G+ cells can all be in the same base station, and even be sent from the same panel antenna.
- The application can show that a base station can cover areas up to a hundred kilometers. These errors can be created if the network data collected by the application has great resemblance with some other base station or if the phone has calculated incorrect GPS-data. At this moment these "orphan cells" can't be removed by the user and they are left on the map.
Nutzung
1. Download App to Android from Google Play or to Windows 10 Mobile here.
2. Aktiviere GPS (bei Android: Nicht die Google locations service).
(bei Android über Einstellungen -> Standort. Wähle dort den "Hohe Genauigkeit" - Modus)
3. Start Application. Ensure you are connected to the 2G/3G/4G/4G+ base station that you wish measure. You do not need data plan but need access to network. Some phone can record without SIM card also.
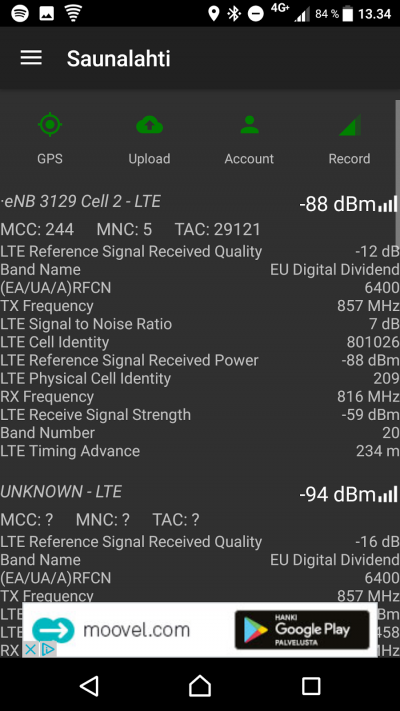
On Android you see here information what on your device. It depends your phone support what you see on screen. This is taken on Sony XZ Phone with Android 7.0. Since Android 7+ mostly phones support band recording also. All Windows 10 Mobile also support band recording.
Icons:
GPS: Green = GPS fix OK, Yellow = Initializing, Red = No GPS Fix, try go to outside to get GPS Fix.
Upload: Green = Upload enabled and ok, Red = Upload Error or disabled.
Account: Green = Login OK, Red = Not logged in or login error.
Record: Green = Record On, Red = Record Off
| Abbreviation | Explanation |
|---|---|
| Cell | Cell ID, this is used to differentiate cells from each other |
| Sector | The sector number of a cell |
| MCC (Mobile Country Code) | The mobile network country-specific code |
| MNC (Mobile Network Code) | Operator-specific mobile network code |
| LTE Cell Global Identify (CGI ) | Base station ID, used to differentiate base stations from each other |
| LTE Reference Signal Received Quality (RSRQ ) | Quality of received signal |
| LTE Signal to Noise Ratio (SINR - Signal-to-interference-plus-noise ratio) | The scale of the SINR measurements are between -20 and +30dB, the bigger the better. Signal strength is though of as "OK" when it is 15dB or over that, the maximum speed is then 50Mbps. You will need roughly 25dB if you wish to reach speeds around 100Mbps. All speed estimations are made using the 20Mhz bandwidth. |
| LTE Reference Signal Recieved Power (RSRP ) | Interprets the quality of the incoming reference signal. -50dBm is the best, -90dBm is good and -110dBm is weak. When the signal is better than -90dBm we can follow the SINR value alone. |
| LTE Received Signal Strength Indicator (RSSI) | Interprets the strength of the incoming radio signal. |
| UMTS RNC-ID | |
| TAC (Tracking Area Code) | Tells the area code consisting of multiple base stations. |
| LAC (Local Area Code) | Tells the area code consisting of multiple base stations. |
Map
The map opens from left side main menu.
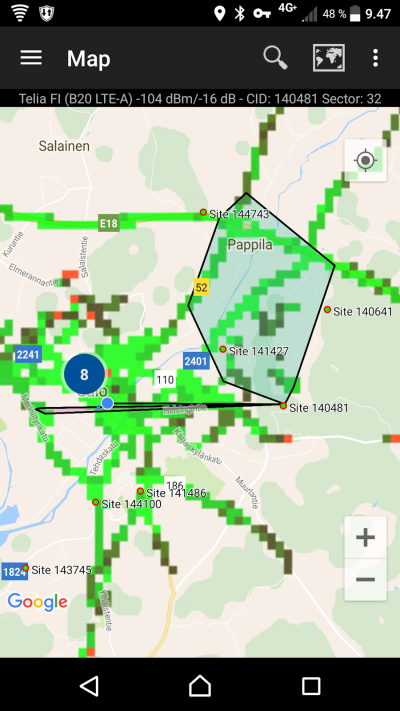
In the maps tab you can see the location of already mapped base stations. The application will automatically only show the base stations of the current network being used (LTE in the picture). The location of base stations can also be viewed from the Cellmapper webmap.
The base station is marked on the map as a red pin in mobile and a red arrow in a browser. A blue pin refers to your own location and the black line tells you which station you are connected to. By clicking on the base station you can see it's range as a black zone. Light green indicates best signal quality, dark green good quality, black average quality and red the weakest signal quality.
On green pin's (on mobile app map have red circle) is some user's located tower. You can locate tower on web map when you have reached over 2 000 points (need account).
By pressing Select Provider (Search Icon) on header you can switch the operator and network so you can inspect base stations of other networks.
Send data to server
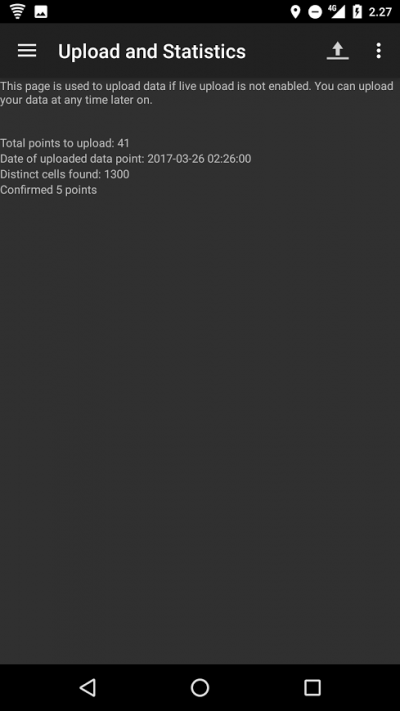
Open left side menu and open Upload and Statistics. You should always upload your newly measured base station so that somebody else won't have to go and redo it, and they can instead view it from the map. The cellmapper map is updated nearly instantaneously .
Press on the Upload icon after this and the data will be sent to the server. We recommend that you also turn on the Enable instant upload feature from the settings, so you don't have to press the button every time.
Account
With Cellmapper account you can track how much tower you have recorded, locate tower on web map etc.
You can register Cellmapper account here.
Need help?
Ask on our community help. We and our great community will help you here: Facebook, Twitter and Google Plus.
You can also send email to support (at) cellmapper.net.


